Information
Visit the official repository to download the example code and get the latest version.
Electronics, but way too big.
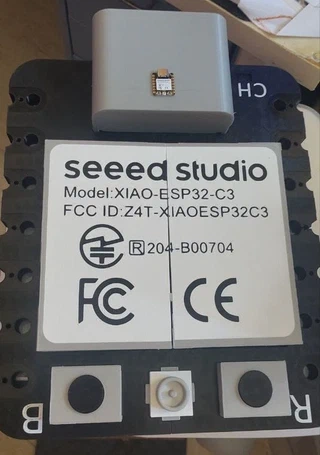
This repo is home to fully functional, 15×-scale, 3D-printed replicas of the components you’d find in Seeed Studio’s TinyGo XIAO Starter Kit. Every replica is a real, working circuit, there’s an actual microcontroller, component or sensor hiding inside each one, wired out to giant, kid-friendly terminals you can poke, clip onto, and solder to without a magnifying glass.
Why though
Because the coolest chips on the planet are also small enough to lose in a carpet. A real XIAO ESP32-C3 is about the size of your thumbnail, great for finished projects, terrible for the first time you try to explain “this is GPIO pin D7” to someone whose hands (or curiosity) haven’t grown into tiny header pins yet.
So: blow it up 15×. Keep it 100% real and functional. Let people press giant buttons, plug in a giant-but-real USB-C cable, and watch a giant strip of LEDs light up because of code they wrote. That’s the whole idea: a teaching prop, a conversation starter, and a genuinely usable dev board, all at once.
This is built for GoEducation workshops and hacksessions, but the designs are open, feel free to print your own.
What’s in the kit (so far)
| Replica | Based on | Status |
|---|---|---|
| XIAO ESP32-C3 | The XIAO ESP32-C3 from the starter kit | Fully built, see the build log |
| Rotary encoder | The Grove rotary angle sensor from the starter kit | Fully built, see the build log |
| LED | Not actually in the official kit, we just wanted a giant LED | 3D model ready |
More macro-sized components will show up here as they get printed, wired, and (usually) accidentally left running on someone’s desk.
Does it actually works?
Yes! The idea is to get fully functional 15× hardware. In the case of the XIAO a real XIAO is hidden inside the 3D-printed housing and every pin it has is routed out to a giant copper-tape pad at 15× scale, in the exact same layout as the real board’s silkscreen. Both buttons works too. You interact with the giant version exactly like you would the tiny one: press its buttons, plug in its (real, tiny) USB-C cable, wire up giant jumper cables to giant pads and the real chip underneath does the work.
No emulation, no fake props. If you can flash a real XIAO ESP32-C3, you can flash this one, it just happens to take up half your desk.
Curious how the giant XIAO was actually built (copper tape wiring, swappable chip housing, the works)? Read the full build log.
Repo layout
.
├── assets/       Logos, stickers, and images used across the docs
├── hardware/     3D printable parts (STL / 3MF / DXF) for each replica,
│                 one folder per component
├── examples/     TinyGo firmware you can flash onto the real chip
│                 hidden inside each replica
├── go.mod
└── go.sum
Getting started
You’ll need TinyGo installed, and the real board that lives inside the replica you’re building (currently a Seeed Studio XIAO ESP32-C3).
Clone this repo, pick an example, and flash it like any other TinyGo project:
git clone ssh://git@git.madriguera.me/GoEducation/macroelectronics.git
cd macroelectronics
tinygo flash -target=xiao-esp32c3 ./examples/<example-name>
Then head to hardware/<component> for the 3D files and, where available, a build guide.
Open hardware
Everything here, 3D models, wiring notes, and firmware, is free to print, wire up, remix, and use in your own workshops. If you build your own giant component, we’d love to hear about it.